UPDATE
This post is now deprecated with the public launch of WSL2. I have a new post documenting how to do this same set up with WSL2. Check it out over here.
NOTE: If you are not running Windows 10 2004 Build 19041 or higher, then you can continue with this post using WSL1.
Introduction
As a robotics researcher, I spend a lot of my time developing in a Linux-on-metal environment. This is because my work revolves around ROS (the Robot Operating System) which requires Ubuntu in order to run. If you want an intro to ROS and the power of working with this highly-extensible software I’ll point you to the ROS website which has many good resources explaining the abilities of this system. Ubuntu in and of itself is not a bad platform, but growing up as a Windows guy I’ve come to love Microsoft’s platform and many of the features and native apps that follow from it (who doesn’t love native, highly supported gaming and a rich ecosystem of powerful professional grade apps?). Plus, no Linux distribution I’ve ever used has quite the polish of Microsoft’s offering.
Because of this, I’ve often wanted a way to develop within ROS on top of Windows. This can be accomplished by spinning up a VM within VirtualBox or VMWare and simply diving into a full Ubuntu desktop, but that takes up precious resources and also means dealing with all the miscellaneous issues with a full Linux install that I’m trying to avoid. Put simply, I wish for a lightweight ROS development environment which will allow me to quickly jump in and out of it without slowing down my Windows host. There are two ways to accomplish this: one way is to simply load up a Docker image based on Ubuntu with ROS pre-installed and away you go. However, Docker containers don’t have a great connection with either your network or your local files and thus aren’t tightly integrated with the Windows platform they are hosted by. The second way to accomplish this is by using WSL (Windows Subsystem for Linux) which is what we will do below.
NOTE: If you’d like to know how to set this up in Docker, I have a tutorial here.
WSL Installation
WSL is simply an emulation of Linux on top of Windows. With WSL 1 this is not quite a VM but also not quite bare-bones and is kind of a mongrel of an OS. You can find a good overview of how it works here. However, it works very well (except for file system performance which we’ll get into a little later) and can handle our ROS needs with ease.
NOTE: As I am writing this WSL 2 is in the works which uses a super light-weight VM on Hyper-V in order to create a fully fledged Linux environment with (almost) all the power of bare-bones Linux. I actually use WSL 2 for my development systems, but you have to run a Windows Insider version for that to work right now. I’ll write an updated post when WSL 2 officially goes live in Spring 2020.
The first step of setting up this ROS development environment on Windows is simply to enable the WSL feature and then install your preferred Linux distribution. Microsoft has a tutorial here about how to do it, but for the sake of continuity I’ll also put it in this walk-through.
To enable WSL, open up PowerShell as Administrator and run this command:
1
Enable-WindowsOptionalFeature -Online -FeatureName Microsoft-Windows-Subsystem-Linux
This will only take a second or two to run (it’s really just flipping a switch internally on Windows) and then you’ll need to reboot your machine. During the reboot process you’ll see that it’s installing new features (that’s our WSL stuff!) and then you’ll be good to go.
Now you can head over to the Microsoft Store app and search for “linux”.
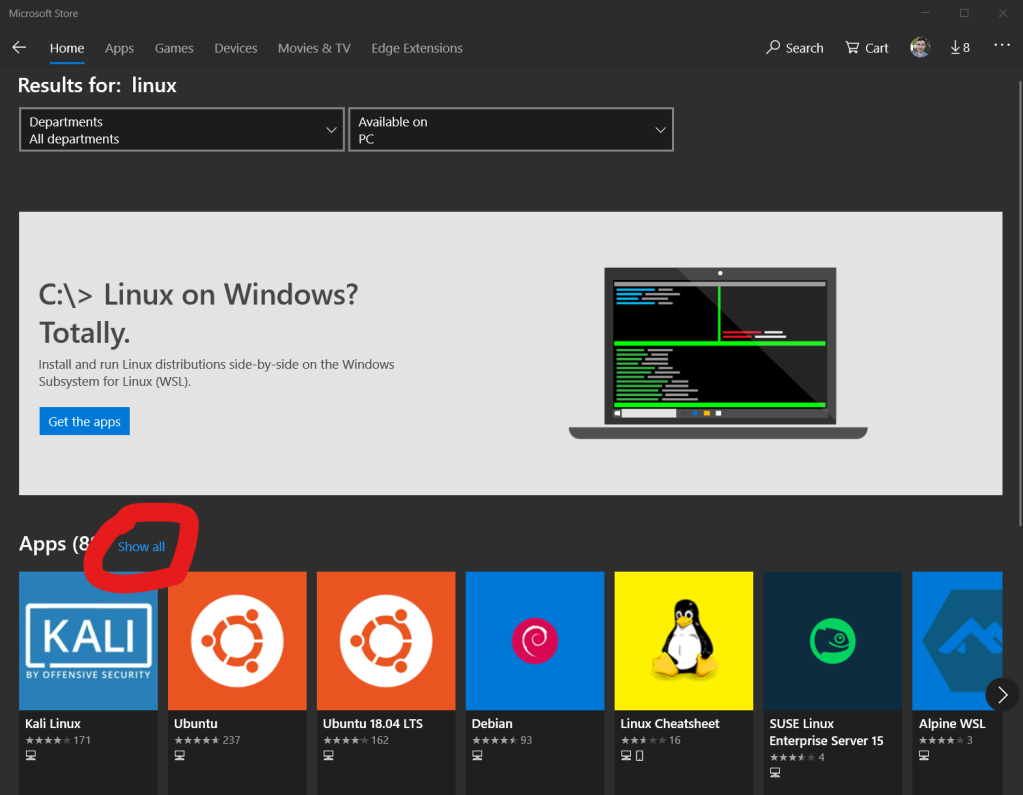
This will give you a bunch of options including Kali, Ubuntu, Debian, and others. For ROS we need Ubuntu installed and, since I spend most of my time on ROS Kinetic, I will choose Ubuntu 16.04 LTS. At the time of writing the store lists, Ubuntu, Ubuntu 16.04 LTS, and Ubuntu 18.04 LTS. If you’d like, you can install Ubuntu 18.04 LTS and then later on install ROS Melodic, but I will proceed in this walk-through assuming 16.04/Kinetic.
NOTE: Keep in mind that Ubuntu and ROS versions are paired with each other: 16.04/Kinetic and 18.04/Melodic. They don’t work interchangeably.
All that being said, simply click on your Ubuntu version of choice and then click install. This will take a bit depending on your internet speeds since the distribution is fairly large. Once it’s done though you’ll have a new app with the Ubuntu logo on it and the name Ubuntu 16/18.04 (depending on which one you chose).
Now we can launch that app and it will take a bit the first time as it needs to run through the initialization of the OS (remember that we are installing a complete operating system here). However, every other boot of WSL will only take a couple of seconds.
Once the initialization is complete you’ll need to create a username and password that you’ll use any other time you want to enter the WSL distribution.
Now you’re in! You have an (almost) fully-featured version of Ubuntu running within Windows with minimal resources being taken up and the ability to launch and kill it in a matter of seconds.
NOTE: Your WSL file system resides within your file explorer at \\wsl$\Ubuntu-16.04 if you’re running Windows 10 19.03 or later).
WSL Extras (optional, but highly recommended)
These are a couple things that I always do in order to boost my WSL productivity. The first is to keep Windows Defender from constantly scanning WSL files (this boosts file system performance in WSL) and the second is to add an X-server to run GUI applications in Windows through WSL. We’ll tackle these below.
Add WSL to the Exclusions List
NOTE: This may only work for Windows 19.03 or later. Go ahead and try it though anyway and let me know how you get on if you’re running some earlier build.
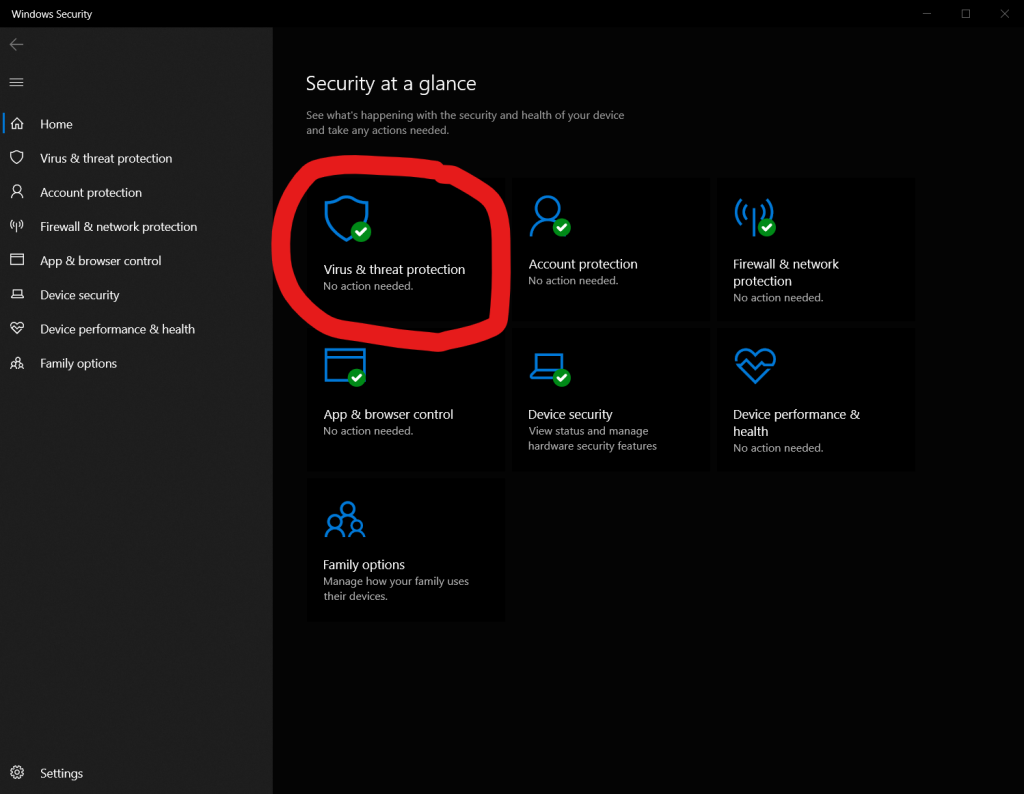
First, open up the Windows Security app. Then click on “Virus & threat protection”.
Now under “Virus & threat protection settings” you’ll see a “Manage settings” option; click that.

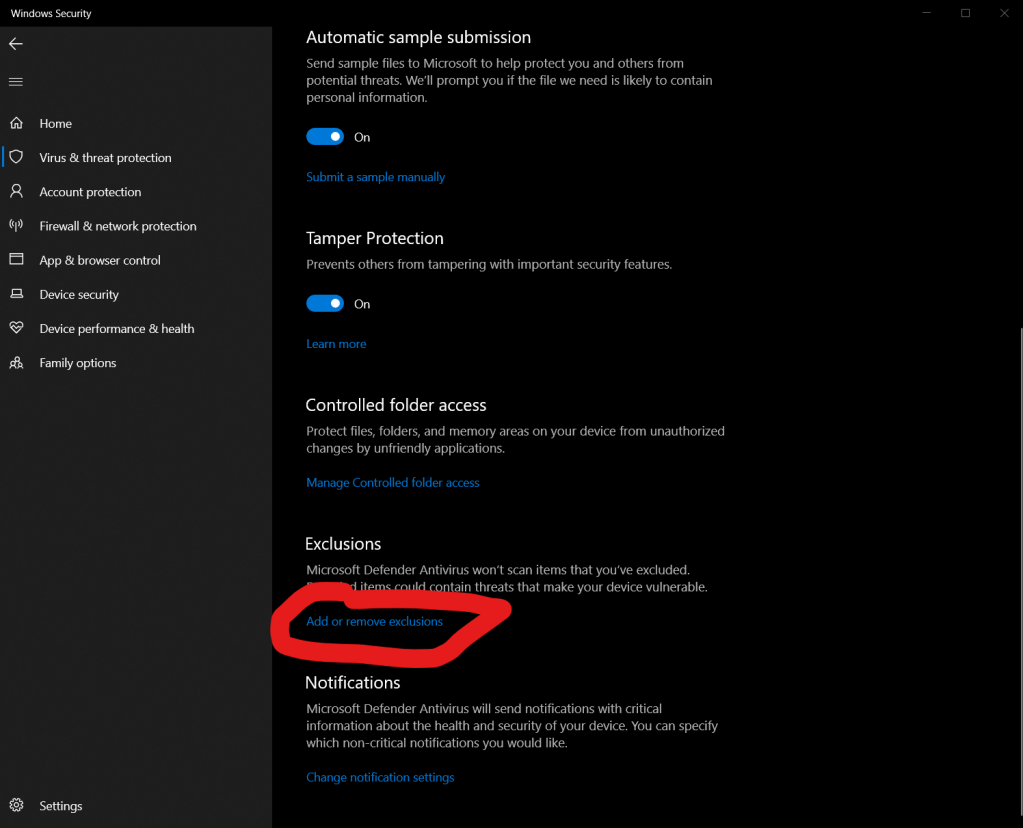
Scroll way down to the bottom of the page and under “Exclusions” you’ll see an option for “Add or remove exclusions”; click that.
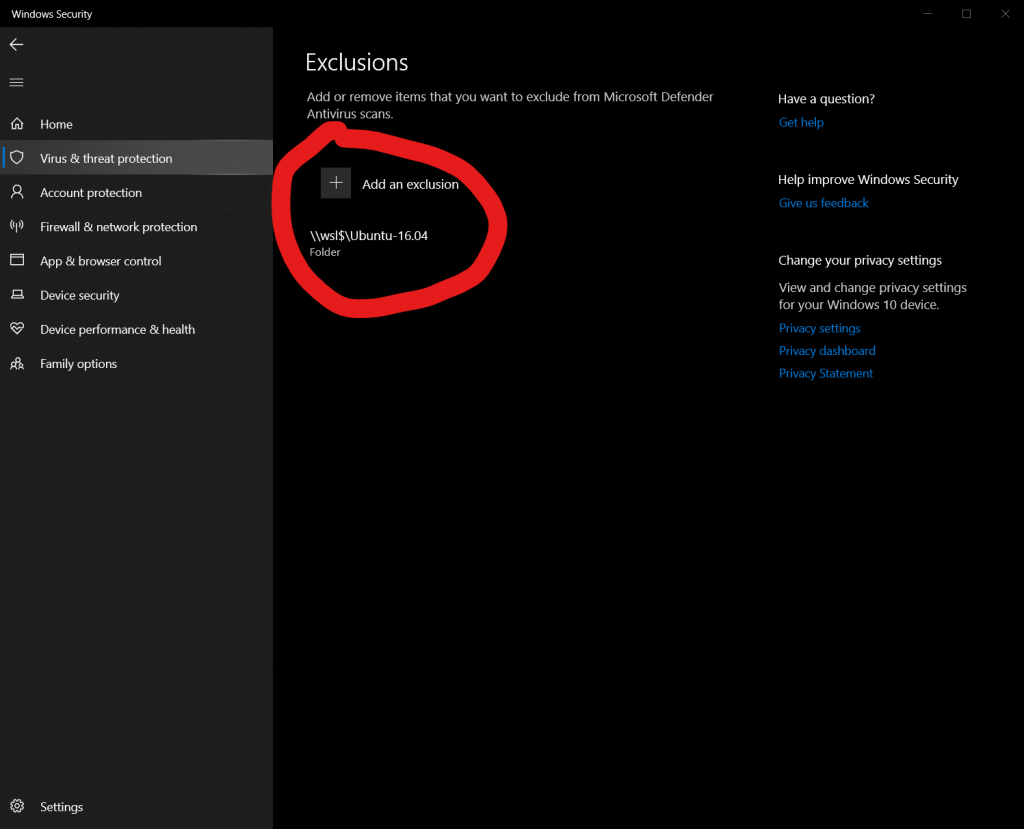
Now you’ll need to press the + next to “Add an exclusion” and then select “folder”. You should now be able to type in your WSL file system location ( \\wsl$\Ubuntu-16.04) and press enter.
Setup GUI forwarding
There are many X-server applications that will allow for GUI forwarding from WSL, but my favorite one is VcXsrv. Go here to download and install it.
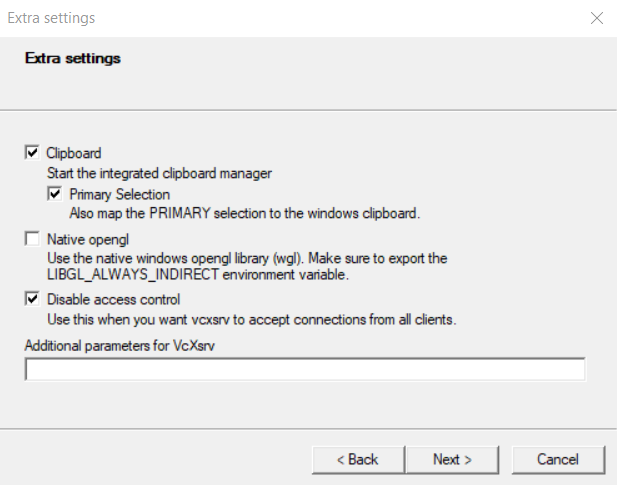
Once you run the installer you may need to launch it from Start in order to set it up. You can simply press “next” a few times to accept all the defaults and then select “finish” to close it out. You should now see it’s icon down in your icon tray which means the server is running.
NOTE #1: right before you click “finish” you can select “Save configuration” so that you can simply double-click the config file to launch VcXsrv with all the defaults. This is a bit faster than clicking through every time.
NOTE #2: You may want to uncheck “Native opengl” and check “Disable access control”. On different systems I’ve had issues with the defaults here. If you do this, be sure to set the environment variable LIBGL_ALWAYS_INDIRECT=0 in your WSL terminal (you can just add export LIBGL_ALWAYS_INDIRECT=0 to the end of your .bashrc file). Your mileage may vary.
Once that’s set up, you can now open your Ubuntu app and run this command to setup the GUI forwarding by adding an export of the DISPLAY variable to your .bashrc file. This way you’ll have this environment variable set with every new shell you open up:
1
echo 'export DISPLAY=:0' >> ~/.bashrc
Now source your edited .bashrc file:
1
source ~/.bashrc
Now everything should be setup for GUI apps to be sent on to Windows for rendering and display. If you want to test the setup, you can install some basic apps within Ubuntu with the below package:
1
2
sudo apt update
sudo apt install x11-apps
And then run:
1
xcalc
To run one of the apps. Or you can install any of your favorite GUI apps or test it with ROS after we install that. Speaking of which…
ROS Installation
Now to install ROS. The ROS team has a great installation guide over here at their website, but like before I’ll go ahead and show it here for completeness. Again note that the below commands are for Ubuntu 16.04/ROS Kinetic. If you chose to go with 18.04/Melodic you’ll need to alter these a tiny bit. Go here for more details.
First we need to add the ROS packages information to the sources list on our WSL system. To do this, open your Ubuntu app and run the below command:
1
sudo sh -c 'echo "deb http://packages.ros.org/ros/ubuntu $(lsb_release -sc) main" > /etc/apt/sources.list.d/ros-latest.list'
Now we need to setup the keys for these package repositories:
1
sudo apt-key adv --keyserver 'hkp://keyserver.ubuntu.com:80' --recv-key C1CF6E31E6BADE8868B172B4F42ED6FBAB17C654
NOTE: If you get some errors with the above command try substituting hkp://pgp.mit.edu:80.
Now we need to update the local list of available packages with these newly added ROS ones:
1
sudo apt update
Now we’re (finally) ready to install ROS. There’s a few options to choose from:
desktop-full: This includes everything; rqt, rviz, simulators, navigation, perception, you name it.desktop: This has most of the above but lacks the simulators, navigators, and perception.ros-base: This is just the basics for getting up and running with ROS. No GUI tools and only what you need to package, build, and communicate over the ROS stack.
My recommendation is to go with desktop-full unless you are super short on storage. It’ll take a bit more time for the initial install and take up more disk space, but you’re guaranteed to have most of the tools you need for anything you’d like to do. However, with all of these you can simply add more tools as you need them. Simply run apt-cache search ros-kinetic to find which ones are available.
Once you’ve chosen the ROS installation you want to get, run the below command and substitute in your choice. I’ll do desktop-full here:
1
sudo apt install ros-kinetic-desktop-full
This will take a long time to run. Remember when I said file system performance is bad on WSL? This is because it’s actually an emulated Linux file system on a Windows file system (this is changing in WSL 2). Don’t worry though, the actual performance of ROS when it’s running in WSL is pretty zippy.
Once it’s done with the install we need to initialize the dependency manager for ROS. Simply run these two commands:
1
2
sudo rosdep init
rosdep update
ROS needs to be sourced each time you open a bash shell and so we can add it to the ~/.bashrc file using the below commands to add it and source it (you can source ROS every time but that defeats the point of making this a dedicated ROS development environment):
1
2
echo "source /opt/ros/kinetic/setup.bash" >> ~/.bashrc
source ~/.bashrc
One last thing to do. For most ROS development you’ll want to be able to build your own packages. So we need a couple more packages in order to make this work. So finally we run this last install command:
1
sudo apt install python-rosinstall python-rosinstall-generator python-wstool build-essential
And you’re done! Welcome to ROS on Windows!
Conclusion
Though this post is pretty long, none of this is actually too hard to setup and can be done in a matter of a few minutes (plus install times). It offers a fairly painless way to get started in ROS development on Windows for those who don’t want to run a VM or dual-boot their systems.
Once everything has been done above, you’re ready for some ROS development. Not everything will be supported in ROS with this setup (networking across devices may be a bit tricky though I’ve never tested it to see), but the basics are all there for most development. If you’re new to ROS, I’d suggest walking through all of the tutorials here to get a handle on things. At least go through the Beginner Level (you can just do one or the other of the C++ and Python ones) so that you have a good foundation to work off of.
I hope this is helpful to somebody and if you have any thoughts on how to improve don’t hesitate to let me know with a comment.