This post has been a long time coming. If you’ve read some of my other tutorials you’ll notice that those development posts have all been helpful in getting to this point. In this post I’ll cover how to setup OMPL with a custom optimization objective that reaches out to the ROS stack for its cost function. This requires installing OMPL and MoveIt! from source and an addition to the OMPL source code that links OMPL to a ROS service that returns the cost value associated with a given state. All of this allows you to easily swap in custom cost functions that OMPL will use for optimizing planners (RRT*, etc.).
This is a pretty lengthy walk through, but I hope you can see the potential of this kind of a system. It allows you to do two very powerful things:
- It allows you to easily add and modify optimization objectives (cost functions) for OMPL without having to touch the OMPL source code. This means that you can modify cost functions without having to recompile. Note also that you can even have the whole system running, take down your cost server and launch a new one without ever having to stop your main OMPL/MoveIt!/rviz client. Also you can see that your cost function doesn’t have to be written in C++. These demo ones are written in Python even though OMPL is written in C++!
- This system also allows for your cost functions to leverage the full power of the ROS stack. While OMPL has a limited understanding of the environment it operates in, your cost function can read from any ROS topic you’d like. This means your cost function can utilize sensor data or even user input which allows it to be a dynamic part of your system.
This post will walk you through how to setup a development environment where you can have all of this running. By the end of this tutorial you should be able to write your own cost functions as ROS services that OMPL will pull from for its optimizing planners.
NOTE: Like a lot of my previous posts, this is a functional solution and could definitely be improved (and in fact I am currently working on improving it). Please let me know of any improvements that you can think of.
Initial Setup
To begin with, you’ll need a working development environment for OMPL and MoveIt!. I’ve already written a blog post on how to do this so check that out here. Walk through that post first with either a Docker or bare-bones Ubuntu/WSL and then come back here to walk through these addition steps.
OMPL Setup
Okay, so you now have a working OMPL and MoveIt! development environment. Now let’s get to the good stuff.
First we need to checkout our custom planning branch for OMPL. You’ll remember from the installation walk-through that we cloned the CAIRO fork of OMPL. This already gives us access to the branch we need so we can simply move into the OMPL source directory and change branches:
1
2
cd ~/ws_moveit/src/ompl
git checkout custom-cost
Now that we’ve got a new version of OMPL checked out we’ll need to rebuild the workspace. However, before we do that we want to change a couple things.
MoveIt! Setup
First, we need to make a couple changes to the MoveIt! source code. This is so that MoveIt! will recognize our new optimization objective that will call out to our ROS service for a cost function. All we need to do is edit the file src/moveit/moveit_planners/ompl/ompl_interface/src/model_based_planning_context.cpp. Open this file up in your favorite text editor.
1
2
cd ../src/moveit
gedit ./moveit_planners/ompl/ompl_interface/src/model_based_planning_context.cpp
Right at the end of the include statements (around line 60) you’ll want to add the following include for our new objective #include "ompl/base/objectives/CustomObjective.h". This means it will now look like the following:
1
2
3
4
#include "ompl/base/objectives/MaximizeMinClearanceObjective.h"
#include "ompl/base/objectives/CustomObjective.h" // Add our new objective

ompl_interface::ModelBasedPlanningContext...
Now scroll down to the switch case defining the different optimization objectives (around line 295). Here you’ll need to add another else if case that will allow MoveIt! to recognize our new objective. The final code should look like the following:
1
2
3
4
5
6
7
8
9
10
11
12
13
  else if (optimizer == "MaximizeMinClearanceObjective")
  {
    objective.reset(new ompl::base::MaximizeMinClearanceObjective(ompl_simple_setup_->getSpaceInformation()));
  }
  else if (optimizer == "CustomObjective")
  {
    // Add our new objective
    objective.reset(new ompl::base::CustomObjective(ompl_simple_setup_->getSpaceInformation()));
  }
  else
  {
    objective.reset(new ompl::base::PathLengthOptimizationObjective(ompl_simple_setup_->getSpaceInformation()));
  }
Now MoveIt! should recognize our custom objective after we rebuild our workspace. Let’s do that now.
1
sudo catkin build
Custom Cost Servers Setup
Now for the good stuff! We can now add some custom cost servers to the mix. These can be whatever you’d like, but to demonstrate how they work, I’ve built a couple dummy ones in the CAIRO GitHub. Let’s clone that repo into our workspace.
1
2
cd ~/ws_moveit/src
git clone https://github.com/cairo-robotics/ompl_cost_server_demos.git
If you take a quick look through the code, you’ll notice that this repo is a super basic ROS package that consists of a few cost servers. Let’s take a quick look at the random number one:
1
2
3
4
5
6
7
8
9
10
11
12
13
14
15
16
17
18
19
20
#!/usr/bin/env python

from ompl.srv import CustomCost, CustomCostResponse
import rospy
import random

def handle_random_cost(request):
    cost = random.random()
    rospy.loginfo("Returning cost: %f"%+-3cost)
    return cost

def random_cost_server():
    rospy.init_node('random_cost_server')
    rospy.Service('custom_cost', CustomCost, handle_random_cost)
    rospy.loginfo("Ready to compute random cost.")
    rospy.spin()

if __name__ == "__main__":
    random_cost_server()
The main thing to note is that there is nothing special about this ROS service except that it imports the CustomCost srv file from the OMPL package and the service name is custom_cost. These two aspects are important since our fork of OMPL defines the srv file and is expecting to find a service waiting for calls with the name custom_cost. The srv file is located at ~/ws_moveit/src/ompl/srv/CustomCost.srv and is printed below:
1
2
3
float64[] state
---
float64 cost
Just to make sure everything is set up properly, let’s build one more time and re-source the workspace.
1
2
3
cd ~/ws_moveit
sudo catkin build
source ./devel/setup.bash
Testing the Setup
Alright, now let’s do a sanity check and make sure that everything works as intended. To do this, we’re going to follow a MoveIt! motion planning tutorial in rviz with the Panda robot arm. This will make sure that all the different components to our system are properly configured. This tutorial can be found on the MoveIt! docs website here, but I’ll include the steps below for the sake of completeness and since we need to make a slight change to get it working with our system.
Before we run the demo, we need to first edit the ompl_planning.yaml file that configures how the demo interacts with OMPL. First we need to move into the panda_moveit_config package and then we need to edit the configuration file. You can open it in whatever text editor you prefer, but on my system I need to use sudo since it’s in the /opt directory.
1
2
roscd panda_moveit_config
sudo gedit config/ompl_planning.yaml
And then add optimization_objective: CustomObjective inside the heading “RRTstarkConfigDefault” right under the “type” key. The final section should look like this:
1
2
3
4
5
6
  RRTstarkConfigDefault:
    type: geometric::RRTstar
    optimization_objective: CustomObjective
    range: 0.0  # Max motion added to tree. ==> maxDistance_ default: 0.0, if 0.0, set on setup()
    goal_bias: 0.05  # When close to goal select goal, with this probability? default: 0.05
    delay_collision_checking: 1  # Stop collision checking as soon as C-free parent found. default
By making this change you’re requesting OMPL to use our custom objective. This can be changed through the rviz interface later on, but we’re setting the default here in the configuration and making sure the optimization_objective key exists. Note that we’ve only added this for the RRT* optimizing planner. If you wish to test this with other planners you’ll have to change those as well.
Okay, so now the demo is configured properly we can walk through it and make sure everything works. Let’s go ahead and start the demo in rviz. I’ll let you follow along with the tutorial here. Go ahead and walk through all the steps if you’re unfamiliar with MoveIt! and rviz. Once you’re comfortable with it, come back here and let’s test our custom objective setup.
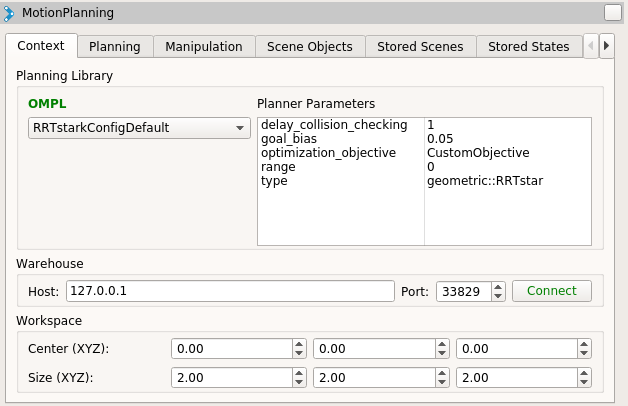
All good? Alright, to run our custom objective we need to select the RRT* (RRTstarkConfigDefault) planner from the drop down in the MotionPlanning pane. It should like this:
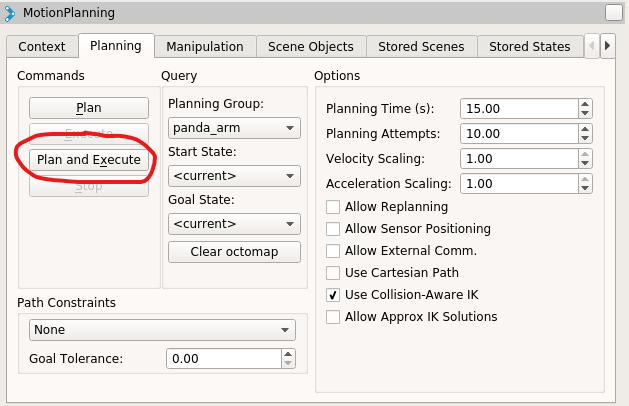
Now click on the Planning tab and then select Plan and Execute (note that your robot must have different start and goal positions for anything to happen). See below:
Now if you go back to the terminal in which you ran the roslaunch command above, you should notice a bunch of warning messages saying something like:
[ WARN] [1572387284.914557300]: Failed to call service custom_cost. Using clearance instead.
This is because we haven’t started a ROS server that is ready to send out costs to OMPL. Since OMPL can’t find the server, it simply defaults to checking the clearance as the cost function for each state.
In order to start our ROS cost server, we can simply launch it using the rosrun command from another terminal (assuming the ROS master node is still running from our roslaunch command):
1
rosrun ompl_cost_server_demos random_cost.py
The above command runs the server we showed the code for above. This server simply publishes random values for the cost to OMPL.
Now that we have that running, go back to rviz and move the start and goal positions of the arm. Once that is done, click Plan and Execute again to make OMPL attempt to find a solution.
If all worked correctly you should see something like the following output from the server node:
[INFO] [1572387558.281799]: Returning cost: 0.743727
This means that OMPL is asking your server for the cost of different states and everything is working!
Conclusion
This was a pretty lengthy walk through, but I hope you haven’t lost sight of the potential of this kind of a system. It allows you to do two very powerful things:
- It allows you to easily add and modify optimization objectives (cost functions) for OMPL without having to touch the OMPL source code. This means that you can modify cost functions without having to recompile. Note also that you can even have the whole system running, take down your cost server and launch a new one without ever having to stop your main OMPL/MoveIt!/rviz client. Also you can see that your cost function doesn’t have to be written in C++. These demo ones are written in Python even though OMPL is written in C++!
- This system also allows for your cost functions to leverage the full power of the ROS stack. While OMPL has a limited understanding of the environment it operates in, your cost function can read from any ROS topic you’d like. This means your cost function can utilize sensor data or even user input which allows it to be a dynamic part of your system.
Please let me know if any of this doesn’t work for you or if you have comments or improvements to offer. This is a project I’m actively working on and hope to implement some cool cost functions using this methodology. Hope this helps you as well!