In another post, I wrote about setting up a ROS development environment within Windows using WSL. Since then, I’ve had a few people ask me about setting up the same system except using Docker. This is very straight forward since there are already pre-built ROS images out on Docker Hub. These can easily be pulled and run with minimal configuration to get it working.
NOTE #1: This installation will set up ROS Kinetic. The same steps will also install any other version of ROS you’d like to use (like Melodic), but you’ll need to change any commands with the word kinetic in them to the ROS distribution of your choice.
NOTE #2: If you’d like to know how to set this up in WSL, I have a tutorial here.
Docker Setup
To begin, you first will have to install Docker and then open a Powershell window. To make sure that Docker is running, you can use the command docker ps. If you get an error, you don’t have Docker properly setup or running on your machine. You can troubleshoot here.
If everything is working, you can now run the below command which will pull down the pre-built ROS image from Docker Hub:
1
docker pull osrf/ros:kinetic-desktop-full
This will take a bit of time depending on the speed of your network and machine. Once that that is downloaded and extracted, we can run this image to start up our ROS container.
1
docker run --name ros-dev -it osrf/ros:kinetic-desktop-full bash
The above command does a few things:
docker runsimply states that we wish to run a Docker image and turn it into a container.--name ros-devis naming the container (you can use any name you want instead ofros-dev).-it {image_name} bashbasically means we want to run the container interactively (ie. we wish to ssh into it and use bash).osrf/ros:kinetic-desktop-fullis simply the image name we wish to run as a container. I am using thedesktop-fullversion of ROS here, but there are smaller images out there that work as well. They just require other packages to be installed later for advanced functionality.
Once this command runs, you should be popped straight into the shell of your new ROS container. We still need a little configuration to properly set it up though.
ROS Setup
First, we need to make sure we are sourcing ROS whenever we enter our ROS container. To do this, simply run:
1
echo source "/opt/ros/kinetic/setup.bash" >> ~/.bashrc
This will add the ROS sourcing script to your .bashrc file so that it will be loaded every time you create a new terminal. Now we need to source it for our current terminal:
1
source ~/.bashrc
Now let’s see if our ROS installation is properly working:
1
roscore
If you get something like the following, you’re system is working correctly!
1
2
3
4
5
6
7
8
9
10
11
12
13
14
15
16
17
18
19
20
21
22
23
24
... logging to /root/.ros/log/58f66bc2-d4a4-11e9-be85-02420aff0002/roslaunch-59fe088dbe6a-325.log
Checking log directory for disk usage. This may take awhile.
Press Ctrl-C to interrupt
Done checking log file disk usage. Usage is <1GB.

started roslaunch server http://59fe088dbe6a:34269/ros_comm version 1.12.14


SUMMARY
========

PARAMETERS
 * /rosdistro: kinetic
 * /rosversion: 1.12.14

NODES

auto-starting new master
process[master]: started with pid [335]
ROS_MASTER_URI=http://59fe088dbe6a:11311/

setting /run_id to 58f66bc2-d4a4-11e9-be85-02420aff0002
process[rosout-1]: started with pid [348]
started core service [/rosout]
You’ve got a perfectly good ROS development environment all set up at this point. Anytime you want to develop in ROS, simply open a Powershell window and run the command below (make sure to substitute in the container name you chose to use before:
1
docker exec -it ros-dev bash
However, if you really want to have the perfect setup, you’ll want to set up the ability to run graphical applications like rviz and rqt_console. See the below steps for this functionality.
Setup GUI Forwarding
There are many X-server applications that will allow for GUI forwarding to Windows, but my favorite one is VcXsrv. Go here to download and install it.
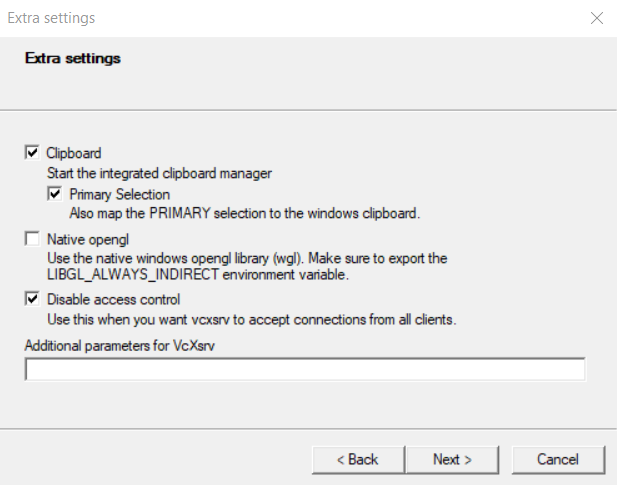
Once you run the installer you may need to launch it from Start in order to set it up. You can simply press “next” a few times to accept all the defaults and then select “finish” to close it out. You should now see it’s icon down in your icon tray which means the server is running. Note: right before you click “finish” you can select “Save configuration” so that you can simply double-click the config file to launch VcXsrv with all the defaults. This is a bit faster than clicking through every time.
Note: You may want to uncheck “Native opengl” and check “Disable access control”. On different systems I’ve had issues with the defaults here. Your mileage may vary.
Once that’s set up, you can now jump into your ROS container and setup the necessary bits on that side. Open a new Powershell window and launch an interactive shell into your ROS container using the command we used before:
1
docker exec -it ros-dev bash
Once you’re in the container, we need to set the DISPLAY environment variable which tells the container where to send the graphics for any application that needs a display to function. To do this, you’ll need to know the IP address for the Windows host machine. You can find this by going to Settings -> Network & Internet and looking under the properties of your current connection (it will probably be labeled as “IPv4 Address”). Then run this command and replace the placeholder with your IP address:
1
echo 'export DISPLAY={your_ip_address}:0.0' >> ~/.bashrc
NOTE: If you’re running this on a laptop then your IP address will change as you move from network to network. Also, if you’re on a larger network (at a school campus or big company) you’re IP may change from time to time. Just keep this in mind that you may need to update this every once in a while.
Now source your edited .bashrc file:
1
source ~/.bashrc
And run the roscore command to launch your ROS master node.
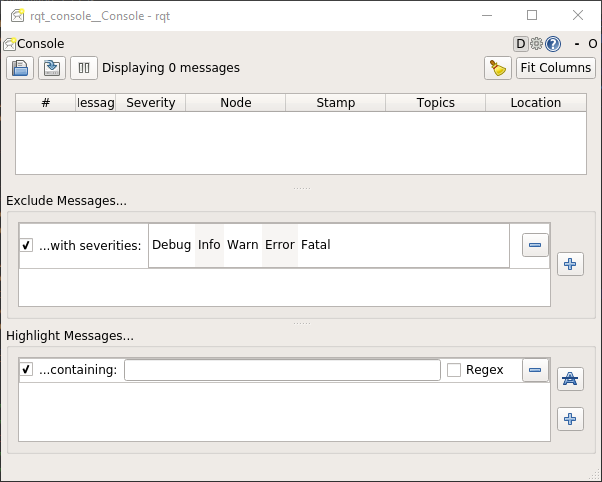
Finally, you’ll need to open up another ROS terminal through another Powershell window and then run the below command to test out your GUI forwarding:
1
rqt_console
If everything went correctly you should see the console window pop up on your screen!
And that’s it! You’ll now be able to develop in ROS with GUI applications such as the console and rviz.
Conclusion
So there it is. That’s how you can set up a fully featured ROS development environment within Docker on Windows. Keep in mind that networking and USB device support will be difficult to manage with this setup (but not necessarily impossible).
I hope this is helpful to some of you and let me know if you have any further questions or comments.