As you can probably tell from my previous posts, I spend a lot of time developing in WSL. In addition to this, I use VS Code as my main text editor/IDE and love it. It’s such a great editor with a ton of functionality and endless extensions. While the basic WSL shell is alright, I recently found out about Powerline which basically adds a ton of visual aids and customization to your terminal. I wanted to try it out but ran into a couple hiccups getting it working. After doing some searching around I got it working, so I thought I’d include my solution here.
Install and Set up Powerline
The first step is to simply install the Powerline package. The easiest way to do this is through pip. We’ll install it with the --user flag so that it goes into our user directory:
1
pip install --user powerline-status
Now we need to add Powerline to our .bashrc file so that it starts with each new shell we create. This is also pretty simple to do since we can just copy paste the following code into the bottom of your existing .bashrc file:
1
2
3
4
5
6
7
8
9
10
# Add this to your PATH if it’s not already declared
export PATH=$PATH:$HOME/.local/bin

# Powerline configuration
if [ -f $HOME/.local/lib/python2.7/site-packages/powerline/bindings/bash/powerline.sh ]; then
    $HOME/.local/bin/powerline-daemon -q
    POWERLINE_BASH_CONTINUATION=1
    POWERLINE_BASH_SELECT=1
    source $HOME/.local/lib/python2.7/site-packages/powerline/bindings/bash/powerline.sh
fi
Before you source this file we need to set up the Powerline fonts so that it will work with WSL (note that this is not the way you’d normally get the Powerline fonts working on a standard Linux installation).
Set up Powerline Fonts
The Powerline fonts are easily available from the powerline GitHub user so we can simply clone the repository and then install. Since this is WSL though, we need to install the fonts through Windows so that our terminal windows know how to find and display them.
Start by opening a Powershell window. Navigate to some directory where you’re good cloning the repo to. Then you can clone the repository, install the fonts, and then remove the repository all in one set of commands:
1
2
3
4
git clone https://github.com/powerline/fonts.git
cd fonts
./install.ps1
cd ..;rm -r -for ./fonts
NOTE: By default, Windows won’t allow you to run Powershell scripts like this one. You may have to change the Execution Policy temporarily to allow the fonts install to proceed. You can find more about this here. Or you can simply do what I did and make the Execution Policy Unrestricted temporarily and then turn it back to Default. Run this command to turn it off:
1
Set-ExecutionPolicy Unrestricted
And then once you’ve run the install script for the fonts you can turn it back to the default:
1
Set-ExecutionPolicy Default
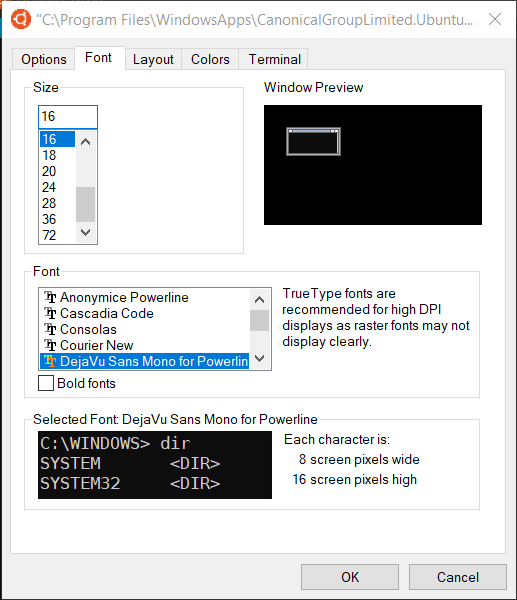
Once the fonts have installed (it’ll take a bit because it pops up a window for each one), you can now set one of the Powerline fonts as the shell font in your terminal. To do this, simply open up your WSL terminal, right click on the top of the window, and select properties, then select the Font tab. Once there, you’ll want to set the font to anything that says Powerline in the name. I like the DejaVu Sans Mono one. It should look like the below:
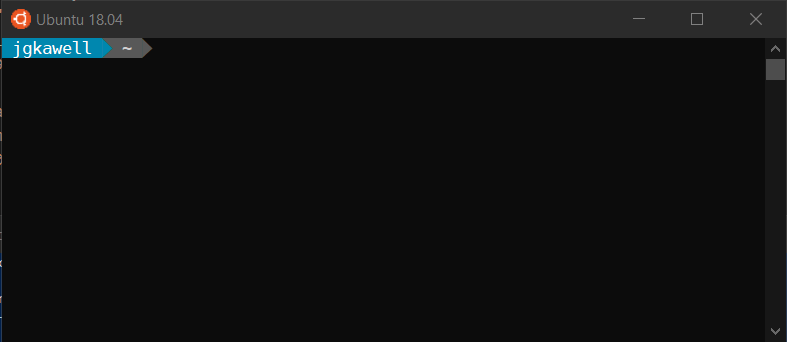
And you’re done! You should be able to close the WSL terminal window, re-open it, and you’ll have Powerline up and running. If it works, your terminal should now look like this:
You can tweak Powerline to your hearts content with different colors, symbols, and such. Since I’m new to Powerline I don’t have much input on all these options but poke around the web and you’ll find plenty of things to tinker with.
Getting Powerline working within VS Code
Now if you use VS Code like I do, you’ll want your integrated WSL terminal within VS Code to also have the Powerline goodness. This change is super simple because all that’s broken with the VS Code terminal is that it’s not using a Powerline font, but instead defaults to a different monospaced font.
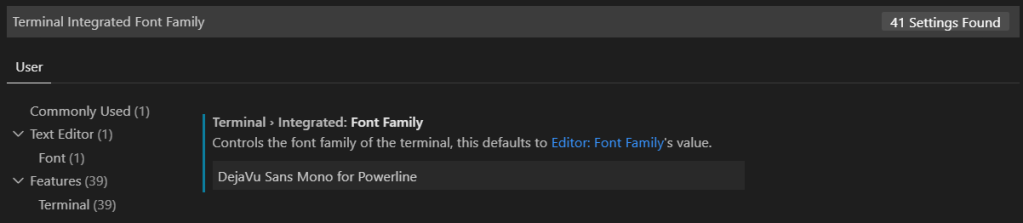
To make it work, simply open VS Code, open up Settings (File -> Preferences -> Settings or Ctrl+,). Then search for “Terminal Integrated Font Family”. Simply replace any font listed there with the Powerline font of your choice:
And that’s it! Now you should have Powerline working in both the default WSL shell (or Windows Terminal) and also have it working in the integrated VS Code terminal.
Conclusion
Thanks for reading! This was a super quick post about getting Powerline setup in WSL and VS Code. Let me know if it doesn’t work for you and how I might change it to make it better.
I’d also like to give a quick shout out to DevPro Media and Bobby Johnson for their tutorials as they were the ones that helped me figure this out. You can find their posts on the subject here and here respectively.